Module 3 Chapter 3
Fancy Edges
Fancy Edges
Bound edges
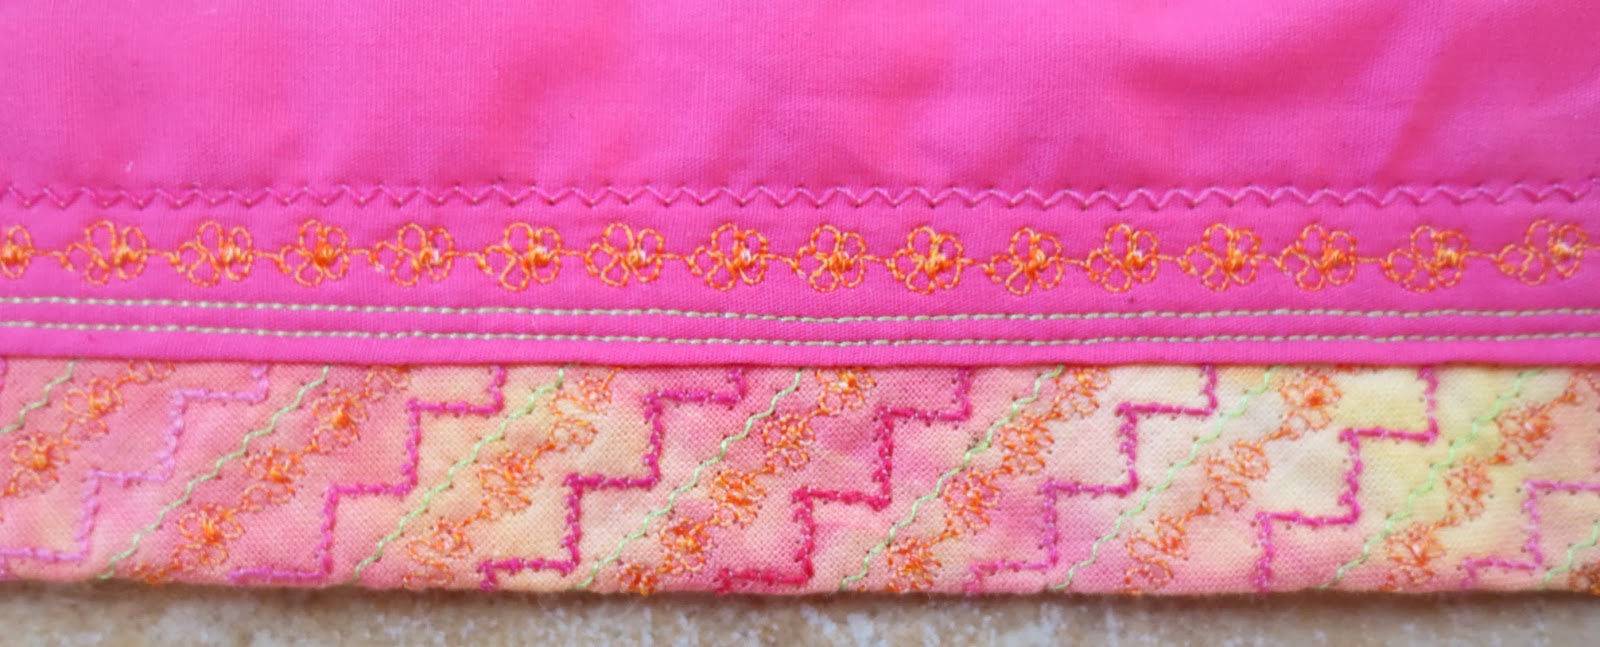
Sample 1
I used decorative stitch patterns to cover a space dyed piece of calico, going across the diagonal. I cut this on the bias and used straight stitch to attach the bias strip to the background (dark pink). Once the edging was in place, I used an automatic stitch pattern of flowers in orange and zig zag stitch in a dark pink to create a sense of continuity.
Sample 2
Bound edge with pin tucks
I used a a twin needle with orange thread through one needle and purple through the other to create pin tucks on the diagonal of a dark pink piece of cotton. I attached the pin tucked piece of fabric to a background fabric, using the same technique that I used for sample 1. I then decorated the background fabric using the flower automatic stitch pattern that I used in sample 1, but in a variegated purple thread.
I used a a twin needle with orange thread through one needle and purple through the other to create pin tucks on the diagonal of a dark pink piece of cotton. I attached the pin tucked piece of fabric to a background fabric, using the same technique that I used for sample 1. I then decorated the background fabric using the flower automatic stitch pattern that I used in sample 1, but in a variegated purple thread.

Burnt edges with automatic stitching
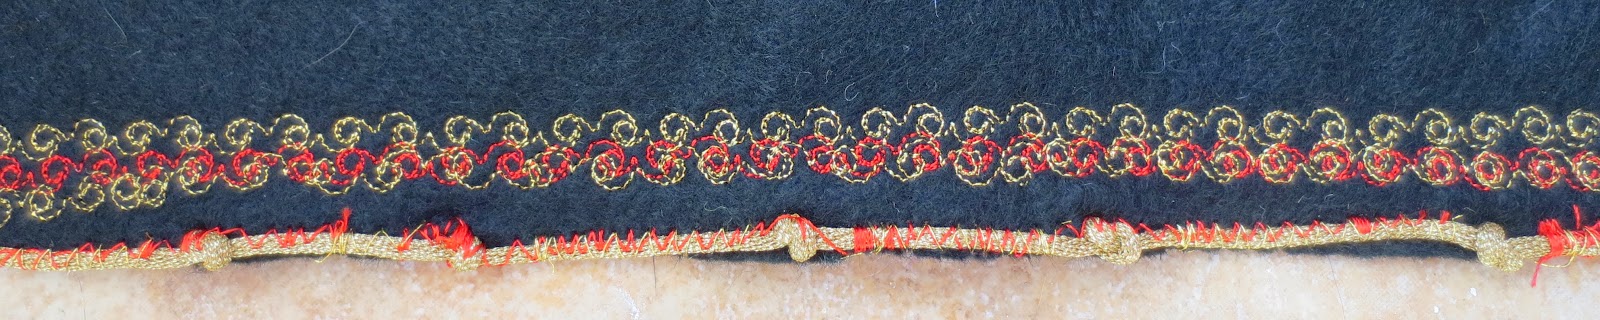
Sample 3
I stitched several lines of automatic stitch patterns on a piece of black kunin felt. Using a soldering iron, I burnt away the felt from the edge of the stitching and also between the lines, inside the square. This created a more irregular edge than the bound edges created in samples 1 & 2.

Burnt edges with free embroidery
Sample 4
I repeated the same exercise, but this time used free machine embroidery on black felt. This time I was able to create a very irregular edge and also burnt away the felt inside the circles that I stitched. I preferred this edge to the one made by the automatic stitch patterns, as there was more freedom to created an irregular edge which could then be taken forward to be used in a future design.

Corded edges
Sample 5
For this sample, I placed a green cord next to the edge of a space dyed piece of felt and then, using an edging foot, stitched a wide zigzag in gold thread. I then stitched along the fabric in gold thread in an automatic stitch pattern to enhance the edging.

Sample 6
For this sample, I used gold cord and knotted it as I sewed along the edge. It was quite difficult to attach the cord as it was quite thick, so I needed to sew along the length twice. I then used a spiral automatic stitch pattern in gold and then red to enhance the edging and to 'pull' the colour scheme together. Even though the zig zag stitching along the edge is quite untidy, I liked the final 'textured' result.
Corded sample 7
I used lengths of blue cord and a zig zag stitch to attach them to a piece of orange felt that had been decorated with automatic stitch patterns. I then used satin stitch to bind the lengths of cord that met at each corner of the fabric. These look like very rudimentary tassels!

Sample 8

Sample 9
For this sample, I tried to attach a cord to a curved edge. I used felt as my background fabric, as it was quite thick and therefore more stable to sew on. I found it too difficult to sew around the curve using the edging foot, so just used the normal foot and kept adjusting the cord and fabric as I went along. It was very difficult to keep the cord along the edge - it kept falling off the edge or ended up being too far in, leaving fabric showing. My curve was quite pronounced, so perhaps this would have been easier with a more gentle one?

Sample 10
For this sample, I attached two cords for the edging on a space-dyed felt background. I then decorated the background fabric with automatic stitch patterns in pink, variegated green and gold thread. The gold cord was attached with a gold thread in zig-zag stitch. I thought the colours of the threads linked well with the background fabric, but didn't really like the gold cord or thread. The felt already had attractive colours and I felt the gold detracted from this.

Wired edges
Sample 11
For this sample, I used floristry paper as my background and two thin pieces of craft wire, which I managed to thread through channels between stitching in order to shape the sample as I wished. I used automatic stitching to decorate the sample in variegated pink/red and also gold.

Close up of sample

Sample 12
For this sample, I used some of the printed and waxed paper I had made in an earlier module as my background. I stitched quite heavily over this in an automatic pattern, using a variegated rust/red thread, green and gold. I then used a second automatic stitch pattern in yellow and orange. I cut the paper into thin strips, close to the stitched edges and then sewed one green and one orange strip together to make the bottom layered edge. I then made a zig-zag pattern with some of the orange and green strips and stitched these to the upper green strip. I enjoyed sewing on paper and liked the effect of using both layering and spaces when joining the strips together. Some of the printed paper can be seen through the stitching and I felt that the colours worked well together.

Lettuce edges
Sample 13
I used a red stretchy jersey fabric and stitched along the edge using satin stitch, pulling as I sewed. When I let go, the edge curved gently in and out.

Layers of lettuce edges sewn together
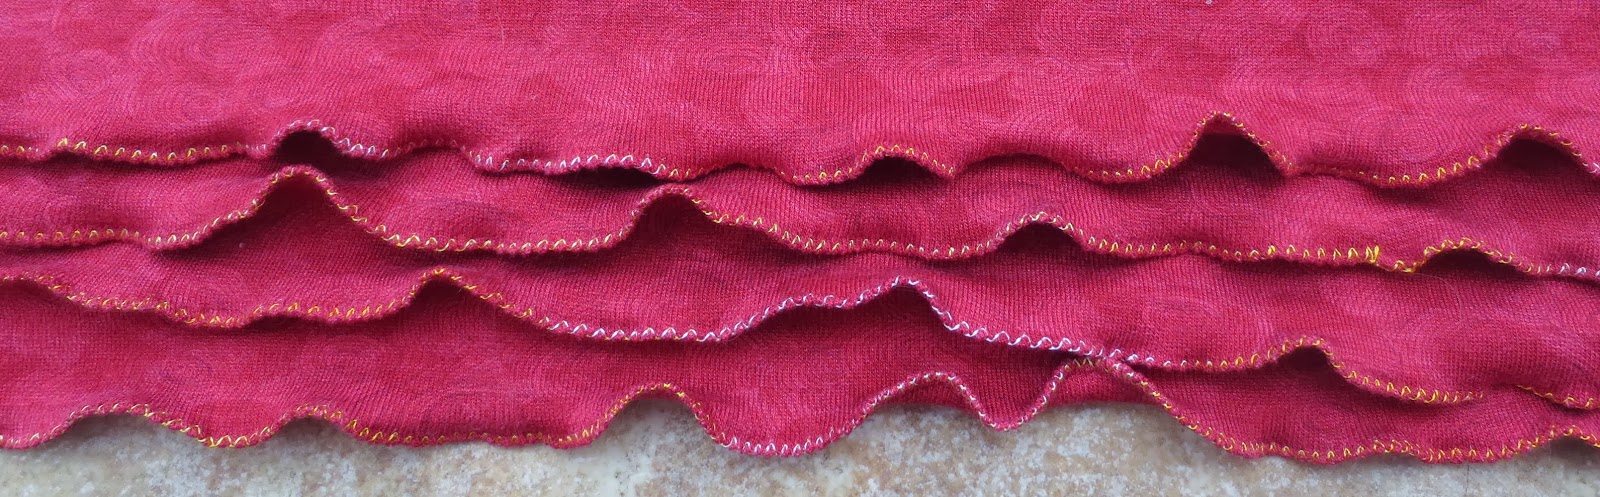
I found that lettuce edges were more difficult to create than I thought they would be. I did pull the jersey quite hard when sewing, so I thought the waves would be more pronounced, but couldn't get the effect I was trying for. Perhaps a different material would be more effective?
Eyelet and button hole edges
Sample 14
Sample 14
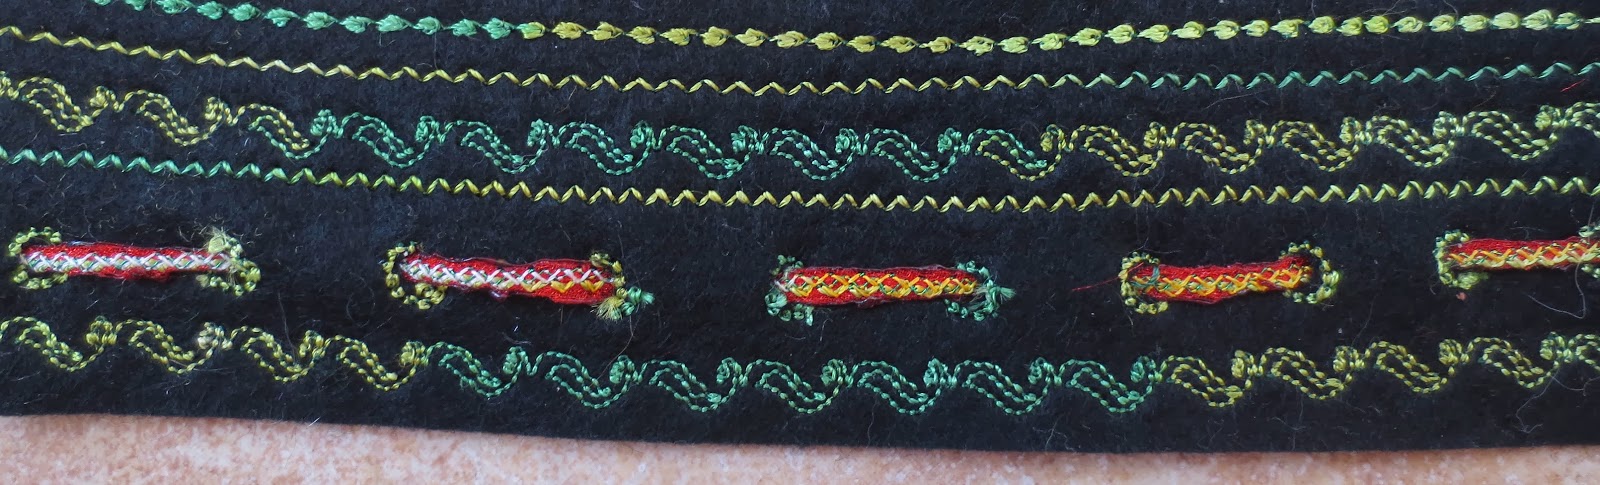
For this sample, I used the eyelet stitch pattern on my machine and then punched holes through the background felt to create a row of holes through which I could thread stitched cord. I then decorated the black felt using a variegated green thread, using a leaf shape pattern, zig-zag and a small, 'nobbled' stitch (running across the top of the picture).
Sample 15

For sample 15, I tried the same effect as sample 14, but used printed paper as my background fabric. As the paper was quite thick, it was easy to manage when sewing and I could see potential for decorating and edging paper this way to use in future work.
Sample 16
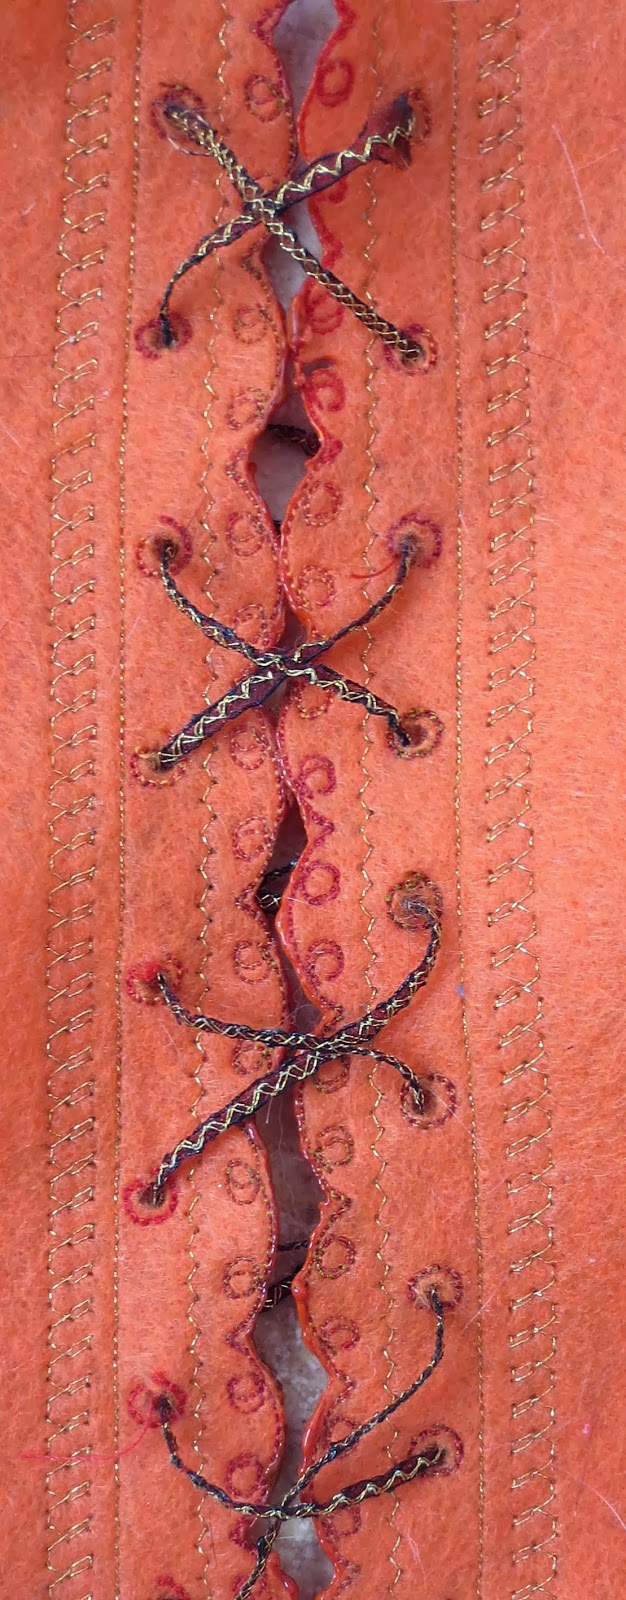
I tried to be a little more adventurous for sample 16, by creating eyelet holes and also a scalloped edge on felt, so that I would be able to lace the two pieces together with a decorated cord. The scalloped edge was burnt away along the stitching. The felt was decorated with automatic stitch patterns in red and gold thread. It was quite difficult to lace and join the two pieces together, as the cords were quite stiff - perhaps this would be easier with a softer/ more flexible cord? I thought that lacing pieces of fabric together had potential to be developed - maybe to lace layers of fabric together?
Sample 17
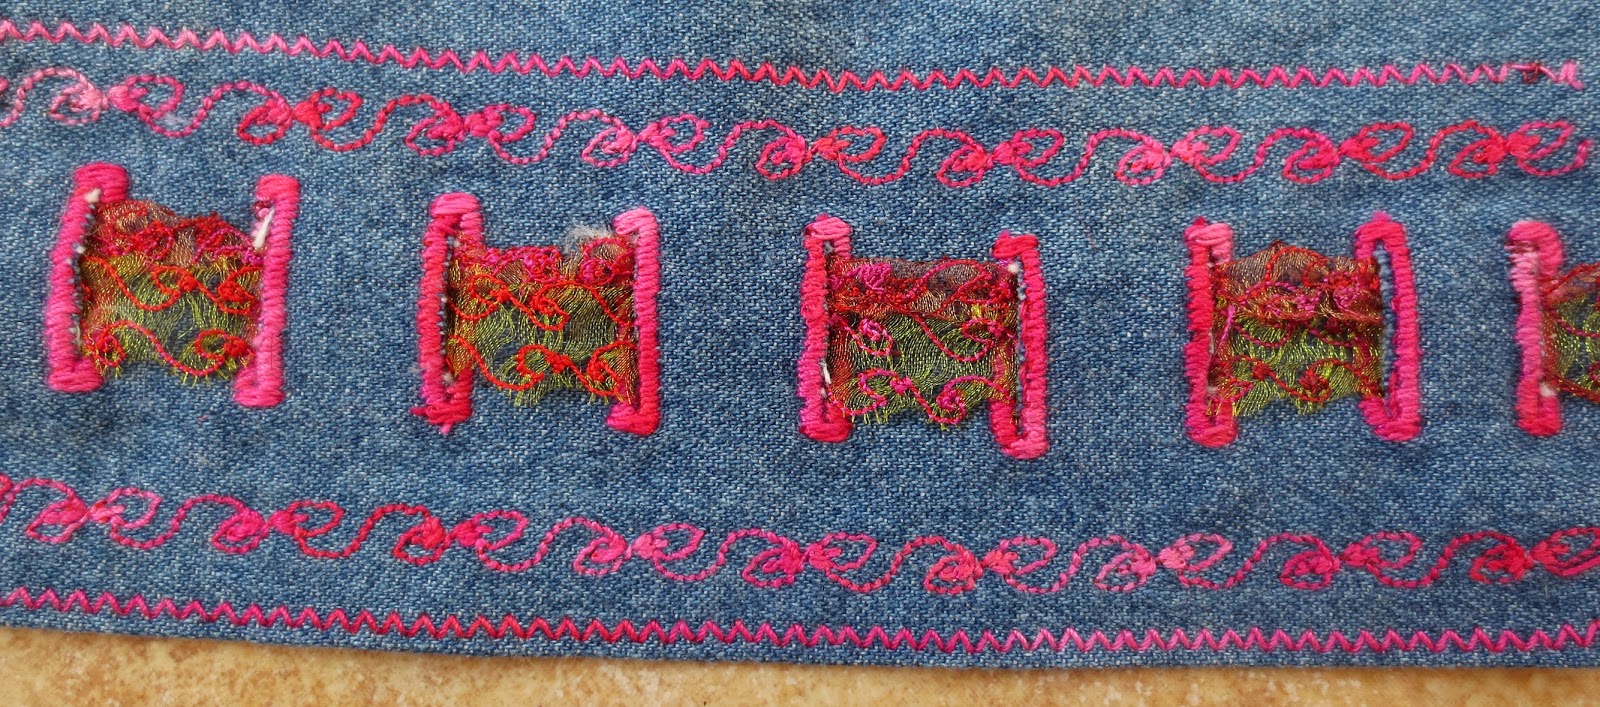
For sample 17, I used denim as my background fabric and create a row of buttonholes edged with a thick, variegated pink thread. I then decorated the background, using the same colour thread using a leaf pattern and a small zig-zag stitch. I made two wide strips/cords by stitching translucent fabric and then burning the sides away. I threaded both cords through the button holes.
Sample 18

For sample 18, I decided to angle the buttonholes in opposite directions in rows. This time I used a variegated purple thread to outline them. I decorated the lilac felt background in variegated green thread in an automatic stitch pattern, as well as straight stitch and also gold thread in a narrow zig-zag stitch. I then decorated an olive translucent fabric in the same automatic stitch pattern as the felt background, but this time using gold thread. I burnt the edges of the strip away and threaded it through the buttonholes. I liked having the buttonholes at different angles, as this is a different way of using a functional stitch - I hadn't really thought of using buttonholes in a decorative way before.
Layered edges
Layered corded edges
Sample 19
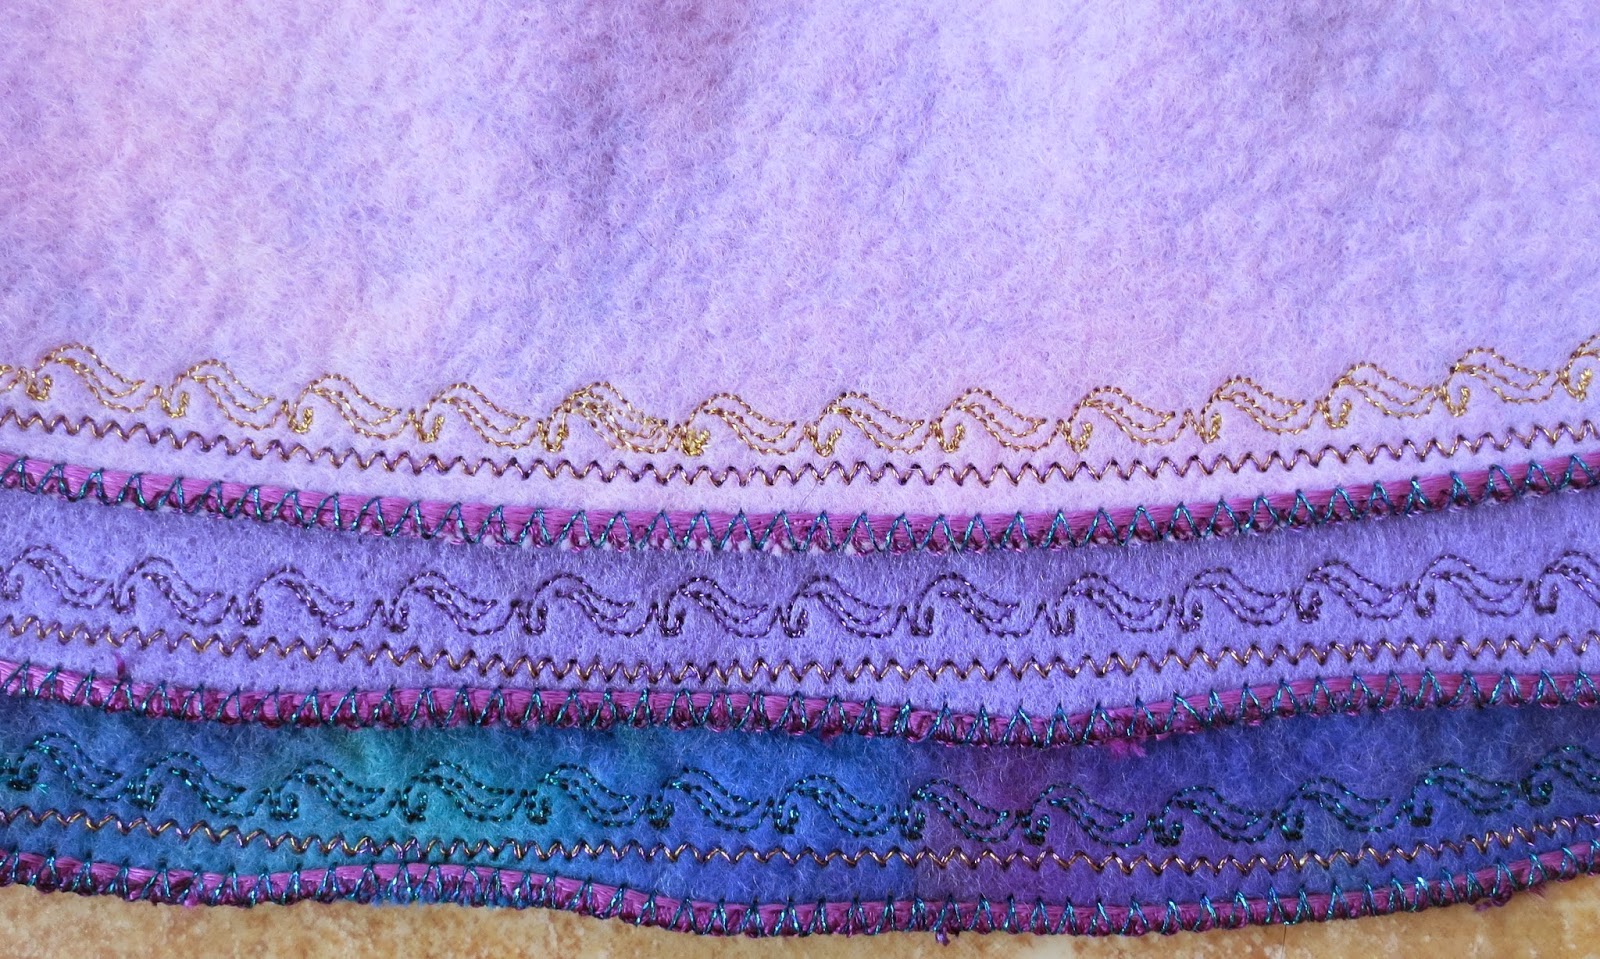
For this sample, I edged different pieces of felt with a purple cord. I chose different shades of purple/lilac for the background in order to create a link throughout the sample and arranges them in order of darkness. The darkest piece also had some blue/green tones. I decorated each piece of felt with the same automatic stitch pattern, but using a different colour thread each time (gold, purple and teal) and also decorated each piece with a narrow zig-zag stitch. The purple cord was joined to the edge of each piece of felt with the metallic teal thread. I then sewed the pieces together. I liked the overall effect created by the layers, colour scheme and stitching and would be interested in developing this technique in future work (perhaps using thinner fabric?)
Layered paper edges
Sample 20

For sample 20, I decided to create a layered effect using Japanese paper strips. First I decorated each piece of paper, using metallic red, gold and navy threads, using zig-zag, a 'zig-zag' type automatic stitch and a more decorative stitch. I then tore the pieces of paper so that they had rough edges. These were arranged in strips (the more decorative, red piece being on top) and were then sewn together, using the same stitches that I had used to decorate them with. This is my favourite sample, as I think that the colours of the papers and stitches link well together and also because I liked the effect of the torn paper edges. I could imagine layering stitched paper together in this way to create the edge of a butterfly wing in a future piece of work.